Running Rust on the Raspberry Pi Pico
Rust is a powerful and very loved language, and the Raspberry Pi Pico is a beefy Arduino Nano alternative (same form factor-ish)
Differences between the two boards:
| _ | Pi Pico | Arduino Nano |
|---|---|---|
| Micro controller | RP2040 (122MHz) | ATmega328 (16MHz) |
| RAM | 264KB | 2KB |
| ROM | 134MB (they say it’s 2MB but it appears as 134MB 🤷♂️) | 32KB |
| Connectivity | USB and UART | USB and UART |
| Power | 1.8-5.5V (16-43mAh) | 5-12V (19mAh) |
| Digital I/O Pins | 26 (16 are PWM) | 22 (6 are PWM) |
| Analog In Pin | 3 | 8 |
| Clock | Yes | No |
| Wifi | Yes (W version with BT5.2) | No |
| Thermal Sensor | Yes | No (what a shame) |
| Is it cool? | Yes | Yes, but in blue |
Installing Rust
So since Rust is mainly used for low level programming, and the low level thing, and there are plenty of HALs (Hardware Abstraction Layer) written in Rust and are ready to use with the Pico, e.g rp-hal, for more details rp-hal docs which what we’ll use with the pico.
First install Rust using rustup
curl --proto '=https' --tlsv1.2 -sSf https://sh.rustup.rs | sh
And then install helper crates:
# add the arm architecture, that will be used when compiling code to the pico.
rustup target add thumbv6m-none-eabi
# to create uf2 images for the RP2040 (without the probe)
cargo install elf2uf2-rs --locked
# cargo-generate is used to scaffold a project from a git repository
# https://github.com/cargo-generate/cargo-generate
cargo install cargo-generate
Creating a project
Now where Rust kicks in, first create a project using rp-hal’s template (it has all the wanted configurations to be done)
# generate an example project
cargo generate --git https://github.com/rp-rs/rp2040-project-template

You need to specify the project’s name here, in my case I’ll name it pico-test
Ignore everything for now, connect the pico (in download mode) and run the project:
cargo run
This will build the project and flash it into the Pico, you’ll see the LED blinking, horray you’re a Rust developer now 🎉 (there’s no going back)
Ok now let’s dive in a bit into the configurations and code
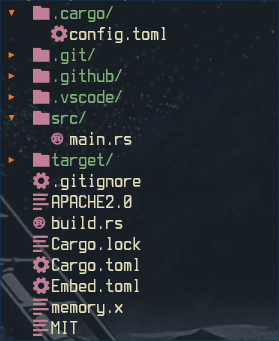
Starting from the bottom (ignoring the markdown files), we have the memory.x, which describes the physical locations of the bootloader, storage, and RAM, DON’T CHANGE ANYTHING, I wanna try changing the storage’s location (since it’s actually bigger, but not now) and it looks like this
/* DON'T CHANGE ANYTHING */
MEMORY {
    BOOT2 : ORIGIN = 0x10000000, LENGTH = 0x100
    FLASH : ORIGIN = 0x10000100, LENGTH = 2048K - 0x100
    RAM   : ORIGIN = 0x20000000, LENGTH = 256K
}

EXTERN(BOOT2_FIRMWARE)

SECTIONS {
    /* # Boot loader */
    .boot2 ORIGIN(BOOT2) :
    {
        KEEP(*(.boot2));
    } > BOOT2
} INSERT BEFORE .text;
And this file’s values are used in the build.rs when building the UF2 image.
Then there is the Embed.tomlwhich specifies the probe’s and building options (trust me mate)
Cargo.toml obviously specifies the package details, the required dependencies, and other stuff, if you want to know more about it go here.
build.rs is where the fun begins, where it converts the output binary elf to a UF2 image that can be transmitted to the pico.
src/main.rs this is where the magic happens, where the Rusty Rust code relies, and if you’re not a fan of Rust’s bloat, go back to C or MicroPython, I’ll just slap the code here and comment some stuff (there are some comments from the template itself)
// ignore the standard library, only uses Rust's core library.
#![no_std]
// tells the compiler to shut up about the non existing main function that returns void.
#![no_main]

// entry point macro, used to specify the main function.
use bsp::entry;
// the logger, oh boy this will be a mess later.
use defmt::*;
use defmt_rtt as _;
// pin control trait (set_low, set_high).
use embedded_hal::digital::v2::OutputPin;
// halts the pico when an error happens.
use panic_probe as _;

// Provide an alias for our BSP so we can switch targets quickly.
// Uncomment the BSP you included in Cargo.toml, the rest of the code does not need to change.
use rp_pico as bsp;

// board support package
use bsp::hal::{
	// for delays and clock related stuff.
    clocks::{init_clocks_and_plls, Clock},
    // peripherals access crate, and that's all you need to know.
    pac,
    // no idea what it does, so...
    sio::Sio,
    // the dog that bites if there is no activity.
    watchdog::Watchdog,
};

#[entry]
fn doesnt_have_to_be_main() -> ! {
    info!("Program start"); // this doesn't work without a probe, go to the end.
    // pins takeover.
    let mut pac = pac::Peripherals::take().unwrap();
    let core = pac::CorePeripherals::take().unwrap();
    // watchdog declaration.
    let mut watchdog = Watchdog::new(pac.WATCHDOG);
    // that's a story for another day.
    let sio = Sio::new(pac.SIO);

    // External high-speed crystal on the pico board is 12Mhz
    let external_xtal_freq_hz = 12_000_000u32;
    // clock setup, just know that it's clock thingy.
    let clocks = init_clocks_and_plls(
        external_xtal_freq_hz,
        pac.XOSC,
        pac.CLOCKS,
        pac.PLL_SYS,
        pac.PLL_USB,
        &mut pac.RESETS,
        &mut watchdog,
    )
    .ok()
    .unwrap();

	// the delay function.
    let mut delay = cortex_m::delay::Delay::new(core.SYST, clocks.system_clock.freq().to_Hz());

	// pins control declaration.
    let pins = bsp::Pins::new(
        pac.IO_BANK0,
        pac.PADS_BANK0,
        sio.gpio_bank0,
        &mut pac.RESETS,
    );

    // This is the correct pin on the Raspberry Pico board. On other boards, even if they have an
    // on-board LED, it might need to be changed.
    // Notably, on the Pico W, the LED is not connected to any of the RP2040 GPIOs but to the cyw43 module instead. If you have
    // a Pico W and want to toggle a LED with a simple GPIO output pin, you can connect an external
    // LED to one of the GPIO pins, and reference that pin here.
    let mut led_pin = pins.led.into_push_pull_output();

	// the event loop, that's why the main returns !, this is where you write the repetitive code.
    loop {
        info!("on!"); // this doesn't work without a probe, go to the end.
        led_pin.set_high().unwrap();
        delay.delay_ms(500);
        info!("off!"); // this doesn't work without a probe, go to the end.
        led_pin.set_low().unwrap();
        delay.delay_ms(500);
    }
}
.cargo/config.toml this little number contains configuration about the build options, it contains what libraries to link into the binary, the target architecture, and the runner options (when running cargo build or run).
If you don’t have a probe do this:
# comment this.
# runner = "probe-rs run --chip RP2040 --protocol swd"
# uncomment this.
runner = "elf2uf2-rs -d"
More Stuff (3 LED blinkers)
#![no_std]
#![no_main]

use bsp::entry;
use defmt::*;
use defmt_rtt as _;
use embedded_hal::digital::v2::OutputPin;
use panic_probe as _;

use rp_pico as bsp;

use bsp::hal::{
    clocks::{init_clocks_and_plls, Clock},
    pac,
    sio::Sio,
    watchdog::Watchdog,
};

#[entry]
fn main() -> ! {
    let mut pac = pac::Peripherals::take().unwrap();
    let core = pac::CorePeripherals::take().unwrap();
    let mut watchdog = Watchdog::new(pac.WATCHDOG);
    let sio = Sio::new(pac.SIO);

    let external_xtal_freq_hz = 12_000_000u32;
    let clocks = init_clocks_and_plls(
        external_xtal_freq_hz,
        pac.XOSC,
        pac.CLOCKS,
        pac.PLL_SYS,
        pac.PLL_USB,
        &mut pac.RESETS,
        &mut watchdog,
    )
    .ok()
    .unwrap();

    let mut delay = cortex_m::delay::Delay::new(core.SYST, clocks.system_clock.freq().to_Hz());

    let pins = bsp::Pins::new(
        pac.IO_BANK0,
        pac.PADS_BANK0,
        sio.gpio_bank0,
        &mut pac.RESETS,
    );

	// declare the wanted pins so we can use them in the event loop.
    let mut gp6 = pins.gpio6.into_push_pull_output();
    let mut gp7 = pins.gpio7.into_push_pull_output();
    let mut gp8 = pins.gpio8.into_push_pull_output();

    loop {
        gp6.set_high().unwrap();
        delay.delay_ms(500);
        gp6.set_low().unwrap();
        gp7.set_high().unwrap();
        delay.delay_ms(500);
        gp7.set_low().unwrap();
        gp8.set_high().unwrap();
        delay.delay_ms(500);
        gp8.set_low().unwrap();
    }
}
Footage of the wiring:
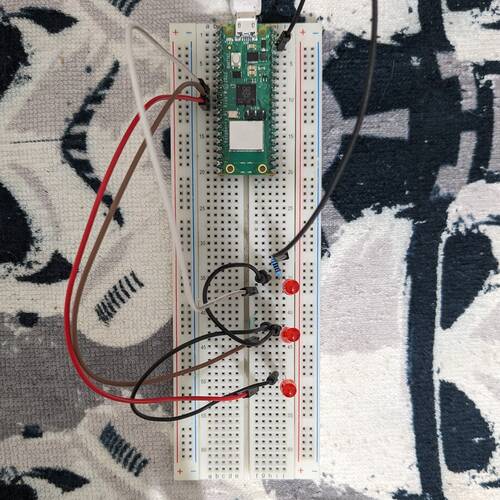
As you can see I used a single resistor on the common ground of the LEDs’ I had to be smart since I don’t have resistors 🤓
More Stuff (push down button)
#![no_std]
#![no_main]

use bsp::entry;
use defmt::*;
use defmt_rtt as _;
use embedded_hal::digital::v2::{InputPin, OutputPin};
use panic_probe as _;

use rp_pico as bsp;

use bsp::hal::{pac, sio::Sio};

#[entry]
fn main() -> ! {
    let mut pac = pac::Peripherals::take().unwrap();
    let sio = Sio::new(pac.SIO);

    let pins = bsp::Pins::new(
        pac.IO_BANK0,
        pac.PADS_BANK0,
        sio.gpio_bank0,
        &mut pac.RESETS,
    );

    let mut output_led = pins.gpio6.into_push_pull_output();
    let input_pin = pins.gpio7.into_floating_input();

    loop {
        if input_pin.is_low().unwrap() {
            output_led.set_high().unwrap();
        } else {
            output_led.set_low().unwrap();
        }
    }
}
And as you can see there’s no need for the clock, and the watchdog, since the events we are running depend on each other, and there’s no other funny business going on, so there’s no need for them.
Footage of the thing:
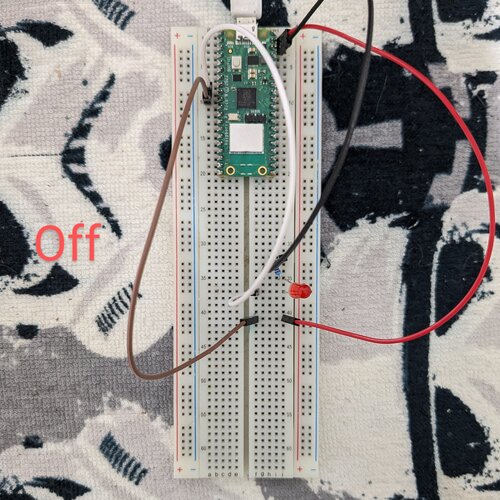
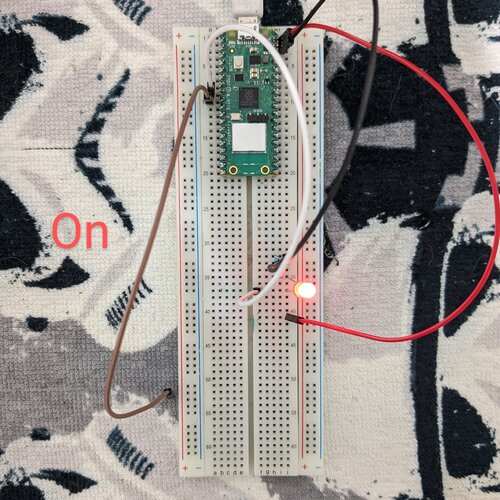
I don’t have a push button either, so I used the wires.
Debugging

Well, I wrote this blog about debugging the Pico while using Rust.