Using a Matrix Keypad with Rust and the Raspberry Pi Pico
I’m using this matrix keypad, but any will do.
Input pin types
Input pins have different types, it’s called resistive pull, where you set a GPIO to an opposite state of what you want to read from the pin, and the initial state helps us to expect what to read from the pin, e.g in pull-up the pin reads high by default, and until provided with a low (below 1.8v) it’ll stay in high state.
States are identified as:
- 3.3v (or 5 in bigger boards) and ground
- 1 and 0
- High and Low
- On and off
It’s not really from a holy book what you call them, as long as you distinguish the difference between the two states.
So there are 3 types of initial pin states (yes 3)
- Pull-up This setup, sets the pin’s voltage to 3.3v (or 5 in bigger boards, but with the pico it’s always 3.3v) and reads high, i.e if we measured the voltage between it and a ground pin it’ll always read 3.3v, well, until a low (ground) voltage is provided by an output pin, this is helpful in the use case of the keypad, since some pins needs to be inputs and the others needs to be output.
And it can be declared like this in Rust using GPIO6 as input:
let some_pull_up_input_pin = pins.gpio6.into_pull_up_input();
- Pull-down The inverse of pull-up where a pin is initially at a low state, i.e reads 0v when measured against ground, and can be provided with a high state to read the difference.
And it can be declared like this in Rust using GPIO7 as input:
let some_pull_down_input_pin = pins.gpio7.into_pull_down_input();
- Floating state
It’s a bit uncertain like Schrodinger’s cat or grandma’s Schrodinger’s plates
 <
<>
And this type of setup is used for push buttons, or switches, where it has no definite initial state, and the detected state can be determined by the provided input, i.e if the provided is high and if we check for high it’ll be high, and same for low.
e.g: using a push button to power on an LED from this post
// imports
use embedded_hal::digital::v2::{InputPin, OutputPin};
// end of imports

let mut output_led = pins.gpio6.into_push_pull_output();
let input_pin = pins.gpio7.into_floating_input();

loop {
	if input_pin.is_low().unwrap() {
		output_led.set_high().unwrap();
	} else {
		output_led.set_low().unwrap();
	}
}
Matrix keypad wiring
The matrix keypad has a clever wiring which utilizes a matrix with its wiring, hence the name, here’s a details image of the thing.
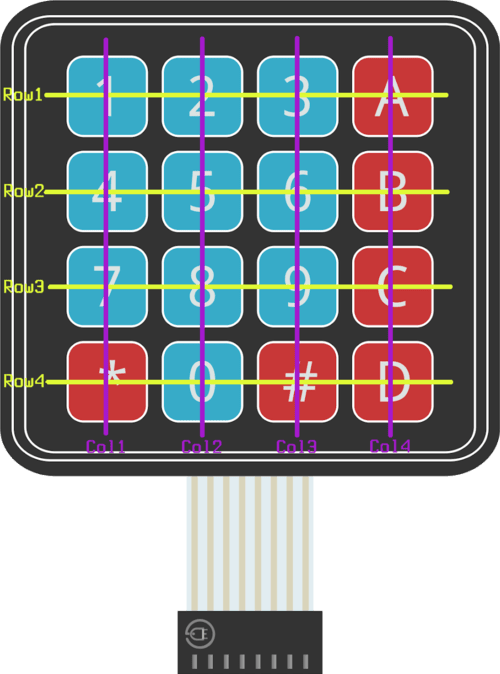
Now what we’re gonna do is wire the rows to output pins, and the columns to pull-down input pins, then send high voltage (3.3v) from each row, and whatever pin receives the voltage will tell us what button was exactly pressed.
What’s gonna happen, is that for each row we’ll set its pin to output high voltage, and check for all columns for a high voltage, where the column with the high voltage is the pressed key.
So, at the end we’ll do something like the following, but on a bigger scale
let mut row1 = pins.gpio2.into_push_pull_output();
let mut col1 = pins.gpio6.into_pull_down_input();
loop {
	row1.set_high();
	if col1.is_high().unwrap() {
		// do something
	}
	row1.set_low();
}
Reading key presses from a keypad
Quick setup
- Generate a project from rp-rs’s template using cargo generate
cargo generate --git https://github.com/rp-rs/rp2040-project-template - Update the
rp-picohal (make sure its version >= 0.8)cargo update --package rp-pico - (skip if you have a probe) UART setup more details here
- Install fugit and defmt-serial
cargo add fugit --features=defmt cargo add defmt-serial- Update
.cargo/config.tomlto use elf2uf2 flasher#runner = "probe-rs run --chip RP2040 --protocol swd" runner = "elf2uf2-rs -d" - Initialize the UART object and use
defmt_serialinstead ofdefmt_rtt
// ...
// update defmt imports
// use defmt_rtt as _;
use defmt_serial as _;
// ...
// add this to the import list
use bsp::hal::{
 clocks::{init_clocks_and_plls, Clock},
 pac,
 sio::Sio,
 uart::*, // the new module
 watchdog::Watchdog,
};
// ...
// import fugit's u32 traits
use fugit::RateExtU32;
// ...
// initialize the URAT handler
let mut uart = bsp::hal::uart::UartPeripheral::new(
   pac.UART0,
   (pins.gpio0.into_function(), pins.gpio1.into_function()),
   &mut pac.RESETS,
)
.enable(
   UartConfig::new(9600.Hz(), DataBits::Eight, None, StopBits::One),
   clocks.peripheral_clock.freq(),
)
.unwrap();
// ...
Wiring
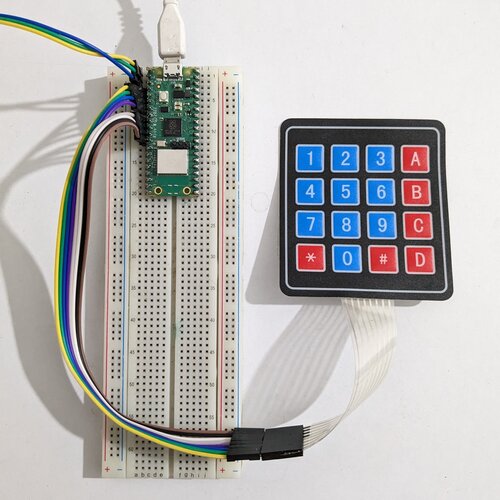
As shown in the image, I’m using GPIOs [2-5] as rows (inputs), and GPIOs [6-9] as columns (outputs), and the code below will clarify the wiring even more.
The code amalgamation
#![no_std]
#![no_main]

// to use write_fmt
use core::fmt::Write;

use bsp::entry;
use defmt_serial as _;
use embedded_hal::digital::v2::{InputPin, OutputPin};
use panic_probe as _;

use rp_pico as bsp;

use bsp::hal::{
    clocks::{init_clocks_and_plls, Clock},
    // just types for the passed rows and columns to the get_pressed_key function
    gpio::{DynPinId, FunctionSio, Pin, PullDown, SioInput, SioOutput},
    pac,
    sio::Sio,
    uart::*,
    Watchdog,
};

use fugit::RateExtU32;

#[entry]
fn main() -> ! {
    let mut pac = pac::Peripherals::take().unwrap();
    let core = pac::CorePeripherals::take().unwrap();
    let mut watchdog = Watchdog::new(pac.WATCHDOG);
    let sio = Sio::new(pac.SIO);

    let external_xtal_freq_hz = 12_000_000u32;
    let clocks = init_clocks_and_plls(
        external_xtal_freq_hz,
        pac.XOSC,
        pac.CLOCKS,
        pac.PLL_SYS,
        pac.PLL_USB,
        &mut pac.RESETS,
        &mut watchdog,
    )
    .ok()
    .unwrap();

    let mut delay = cortex_m::delay::Delay::new(core.SYST, clocks.system_clock.freq().to_Hz());

    let pins = bsp::Pins::new(
        pac.IO_BANK0,
        pac.PADS_BANK0,
        sio.gpio_bank0,
        &mut pac.RESETS,
    );

    let mut uart = bsp::hal::uart::UartPeripheral::new(
        pac.UART0,
        (pins.gpio0.into_function(), pins.gpio1.into_function()),
        &mut pac.RESETS,
    )
    .enable(
        UartConfig::new(9600.Hz(), DataBits::Eight, None, StopBits::One),
        clocks.peripheral_clock.freq(),
    )
    .unwrap();

    let mut row1 = pins.gpio2.into_push_pull_output().into_dyn_pin(); // dyn pins allow us to
                                                                      // specify its type for the
                                                                      // get_pressed_key function
    let mut row2 = pins.gpio3.into_push_pull_output().into_dyn_pin();
    let mut row3 = pins.gpio4.into_push_pull_output().into_dyn_pin();
    let mut row4 = pins.gpio5.into_push_pull_output().into_dyn_pin();

    let mut col1 = pins.gpio6.into_pull_down_input().into_dyn_pin();
    let mut col2 = pins.gpio7.into_pull_down_input().into_dyn_pin();
    let mut col3 = pins.gpio8.into_pull_down_input().into_dyn_pin();
    let mut col4 = pins.gpio9.into_pull_down_input().into_dyn_pin();

    loop {
        match get_pressed_key(
            [&mut row1, &mut row2, &mut row3, &mut row4],
            [&mut col1, &mut col2, &mut col3, &mut col4],
        ) {
            Some((row, col)) => {
                uart.write_fmt(format_args!("pressed {:?} {:?}\r\n", row, col))
                    .unwrap();
            }
            None => {}
        }
    }
}

// the star of the show, where it lights up the rows and checks if there's a receiver column,
// of course the arrays' size can be changed if you have a different keypad.
fn get_pressed_key(
	// I just checked the pins' types and slapped them over here.
    rows: [&mut Pin<DynPinId, FunctionSio<SioOutput>, PullDown>; 4],
    cols: [&mut Pin<DynPinId, FunctionSio<SioInput>, PullDown>; 4],
) -> Option<(RowOrder, ColOrder)> // fancy Rust option enum
								  // bla bla bla
{
    for i in 0..rows.len() {
        rows[i].set_high().unwrap();
        for j in 0..cols.len() {
            if cols[j].is_high().unwrap() {
                rows[i].set_low().unwrap();
                return Some((RowOrder::get_order(i as u8), ColOrder::get_order(j as u8)));
            }
        }
        rows[i].set_low().unwrap();
    }
    None
}

// some enums declaration, and implementations.

#[derive(Debug)]
enum RowOrder {
    Row1,
    Row2,
    Row3,
    Row4,
    None,
}

impl RowOrder {
    fn get_order(index: u8) -> RowOrder {
        match index {
            0 => RowOrder::Row1,
            1 => RowOrder::Row2,
            2 => RowOrder::Row3,
            3 => RowOrder::Row4,
            _ => RowOrder::None,
        }
    }
}

#[derive(Debug)]
enum ColOrder {
    Col1,
    Col2,
    Col3,
    Col4,
    None,
}

impl ColOrder {
    fn get_order(index: u8) -> ColOrder {
        match index {
            0 => ColOrder::Col1,
            1 => ColOrder::Col2,
            2 => ColOrder::Col3,
            3 => ColOrder::Col4,
            _ => ColOrder::None,
        }
    }
}
Assigning actions to a key’s press
Instead of just printing the pressed key’s location, add an action for it to do, I would’ve demonstrated with LEDs, but I don’t have enough to that, and well that’ll be it.
Quote of the day
It’s more like quote of the time I wrote the blog post, I’ll keep doing this as long as I remember.
“Smart Data Structures and dumb code works a lot better than the other way
around.”
- Eric S. Raymond